FAQ
PC requirements for the LMK
| LMK 6 models | Recommended | Minimum |
|---|---|---|
| Operating system | Windows® 10 (64bit) | Windows® 10 (64bit) |
| Processor | i7 8x 3.00Ghz | No requirements |
| Memory | 16 GB | 4 GB |
| Storage | 10 GB SSD | 10 GB HDD1 |
| Graphic card | No requirements | No requirements |
| Network | Separate GigE-Ethernet network card2 for local camera communication with min. 512 buffer size | Separate GigE-Ethernet network card2 for local camera communication with min. 512 buffer size |
| Peripherals | Mouse, Keyboard, Monitor | Mouse, Keyboard, Monitor |
| Additional slots | No requirements3 | No requirements3 |
| Internet | No internet connection necessary | No internet connection necessary |
| LMK 5 models | Minimum |
|---|---|
| Operating system | Windows® 10 (32bit) |
| Processor | No requirements |
| Memory | 1.5 GB |
| Storage | 32 bit: min. 2 GB 64 bit: min 10 GB |
| Graphic card | No requirements |
| Network | Separate GigE-Ethernet network card for local camera communication |
| Peripherals | Mouse, Keyboard, Monitor |
| Additional slots | No requirements |
| Internet | No internet connection necessary |
TechnoTeam GigE camera installation
Hardware installation
The camera is operated from the PC via the Gigabit-Ethernet network adapter. To start up the camera, connect the LMK to the network adapter and the power supply.
Adjusting the network adapter
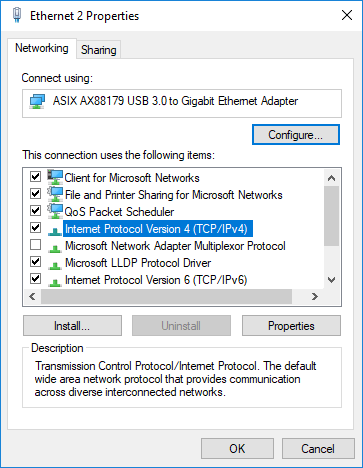
In Windows 7/8/10, open the “View Network status and tasks” dialog by searching for “control panel” in the Windows Start menu. Next, click on “Change adapter settings” to open the “network connections” dialog. There you will see the available networks. Click on the network connection to the camera (named “Unidentified connection”).
Setting the IP-address
Access the properties dialog of this network connection by right-clicking on the connection icon. Next, select “Internet Protocol Version 4 (TCP/IPv4)” and click on “Properties”. This opens the dialog in the following picture. In this dialog, you can see the recent settings of the IP address of the network adapter.
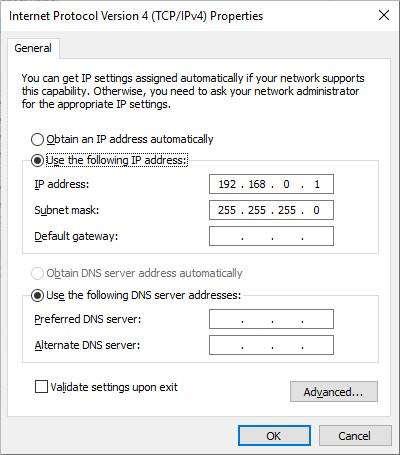
The preset IP address of the camera is “192.168.0.51”. For the correct configuration of the network adapter, an IP address in the same IP segment as for the camera must be used. You also must switch off the automatic IP address setting via DHCP protocol, as the LMK does not support this.
When manually entering a new IP address for the network adapter, the first three digits must be the same to fall into the same IP segment. The last digit must be a different number (except “0” and “255”). You can use the IP address “192.168.0.1” for example.
Configuration of the adapter card settings
To ensure smooth image capturing even with slower hardware, you can also configure the hardware chipset settings of the network adapter for maximum performance.